Task
Procedure
-
In the Shape Fields dialog box, click the New Field button.
-
In the New Field dialog box, click the field you want to insert and click OK. You may need to expand categories to see a field.
-
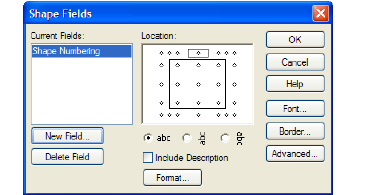
In the Shape Fields dialog box, you may click a position indicated by the small diamonds in the Location window, select the Include Description check box if you want to display a predefined description of the field, set text orientation, font style, or advanced settings such as the dimensions to display the field. See the table entries below for more information.
Delete a shape field
In the Shape Fields dialog box, select the field to be deleted and click the Delete Field button.
Move a shape field
-
In the Shape Fields dialog box, select the desired field in the Current Fields list.
-
Click and drag the field box to reposition the field in the Location window.
Display a shape field description
In the Shape Fields dialog box, select the Include Description check box.
Set Font and Border styles
Edit the Font style or Border style shown when the field data is displayed by clicking the Font or Border buttons. See the Help in those dialog boxes for more information.
Set Advanced display options, such as text wrapping
In the Shape Fields dialog box, click the Advanced button and select any of the following options:
-
Limit Text Width (Allow Line Wrapping): Check the box to wrap the shape field text within a specific width. Set the width by using the spinner buttons or typing a width in the box provided.
-
Hide Text: Check the box to Hide the shape field in the diagram
-
Freeze Text: Check the box to protect field text from being updated.